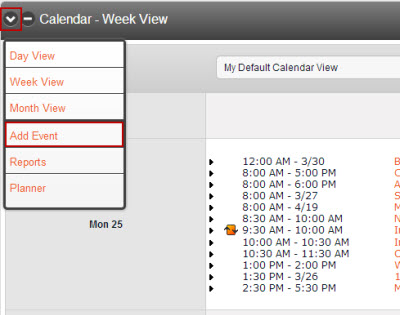
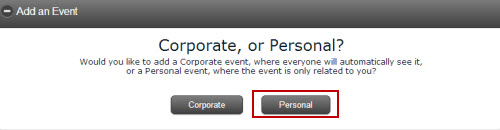
Add Event
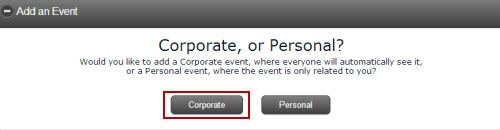
Both Corporate and Personal events can be scheduled using the Events function. Corporate events can be seen by everyone in the company, while Personal events will display on the calendar only for individuals in the same classification.
Corporate
To add a Corporate event,
Select Add Event from the Calendar action icon menu.
Click the Corporate button.
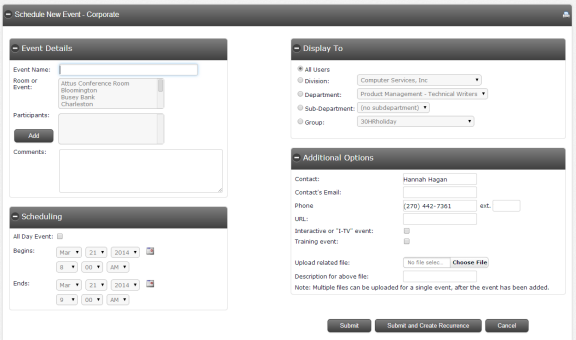
Complete the fields on the Schedule New Event page. An asterisk (*) indicates a required field.
|
Field Name |
Description |
Required |
|
Event Name |
Description or name of meeting |
yes |
|
Room or Event |
Select the room in which the meeting will be held from the list. |
yes |
|
Participants |
CSI SecureConnect allows users to check participants’ schedules while setting up a meeting and then send an email to each participant with meeting details after scheduling is complete. |
no |
|
Comments |
Enter additional meeting description or comments here. |
no |
|
All Day Event |
Select this check box to schedule the event for 24 hours. |
no |
|
Begins |
Enter a beginning date and time. |
yes |
|
Ends |
Enter an ending date and time. |
yes |
|
Display To |
Select the Division, Department, and Sub-Department for which you wish to schedule an event. You may also choose to have the event displayed to groups of users by selecting the appropriate grouping. By default, everyone in the organization will see the event. However, you can restrict this capability to the Division only, Department only or even Sub-Department only. |
yes |
|
Contact |
Enter a contact name. This will pre-fill with the user’s name. |
no |
|
Contact’s Email |
Enter a contact email address. This will pre-fill with the user’s email address. |
no |
|
Phone |
Enter a contact phone number. |
no |
|
URL |
Enter an internet address that can be associated with this meeting. |
no |
|
Interactive or “I-TV” event |
If the Interactive check box is selected, an email will be sent automatically to specific users as designated by the Site Administrator. |
no |
|
Training event |
If the event is considered a training event, select the check box. The event will be flagged in blue. |
no |
|
Upload related file |
Upload a document that can be associated with this event. Note: Multiple files can be uploaded after the event has been scheduled. To upload additional files, first, select the event from the calendar. Next, select Add or Edit Files from the menu. From this screen, users can browse for additional files. |
no |
|
Description for above file |
Enter a description of the file that was uploaded. |
no |
Click Submit to add the meeting to the calendar.
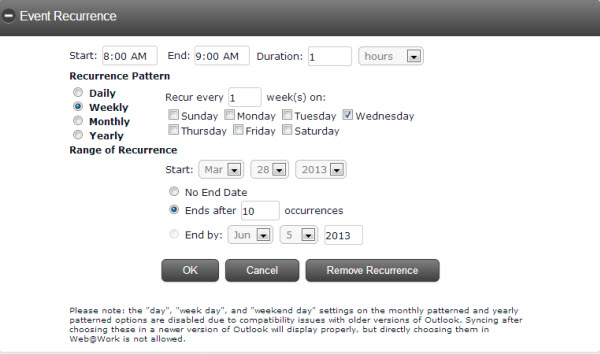
To create a recurring event, click the Submit and Create Recurrence button. You will be given the opportunity to define the meeting frequency.
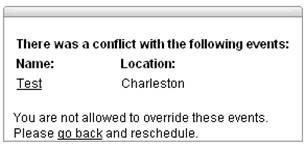
If there is a conflict with another meeting, you will be notified.
Personal
To add a Personal event,
Select Add Event from the Calendar action icon menu.
Click the Personal button.
Enter an Event Name, Location and Comments.
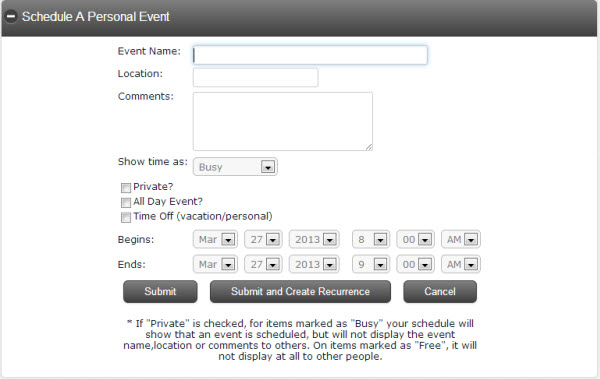
In the Show time as drop-down menu, select from Free, Tentative, Busy or Out of Office.
If Free is selected, the event name and details will display to you, as well as all other users. This selection is useful for reminding other users that you are available, without the event displaying in the conflict report.
If the Show as unavailable? check box is selected, the actual event name and details will display to you. "Unavailable" will display to all other users. This indicates a private event.
If the All Day Event? box is checked, it will automatically adjust the time for 24 hours.
If the Timekeeping system is enabled, choosing the Time Off check box will automatically take you to the Time Off Request section.
For more information on requesting time off, please refer to the Timekeeping manual.
If the event is only scheduled for one date and time, click the Submit button.
If the event is a recurring event, click the Submit and Create Recurrence button. From there you can choose the recurrence pattern and the range of the recurrence.
Personal calendar items are noted in orange on the Corporate Calendar and are shown in Today’s Events on your profile.
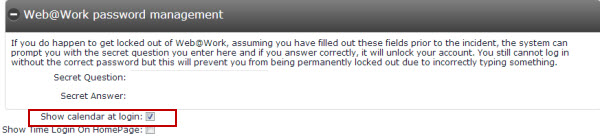
If the Show calendar at login? check box is selected on your profile (Edit Main Details, Internet), a pop-up window will display today’s personal events when you log on to CSI Secure Connect.
To view the full personal calendar for the week, select the action icon displayed beside Today’s Events on the profile and click View Calendar (week view).

Any personal events can be edited by selecting the orange-marked entries on the Corporate Calendar or from the calendar on your profile. Select the event, then click the Edit button to make any changes.