Comma delimited. Steps to create a comma delimited file in Notepad:
Open Notepad.
Files must contain the following fields: Account Number – Must be an account that has positive pay enabled, Amount, Serial Number.
The following fields can be added but are not required: Filler – Any extra field not already listed, Payee, Void, Write Date.
Each line is an issued check, and all lines must contain the same fields. The fields can be in any order – the order of the fields will be set during file upload. Fields are separated from one another by use of a comma – thus Comma Delimited
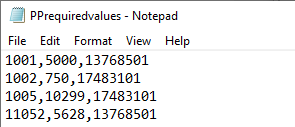
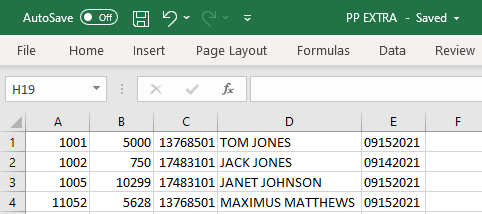
Example of file with just required values: Order of fields is Check, Amount (without decimals), Account Number. Again, these can be in any order.
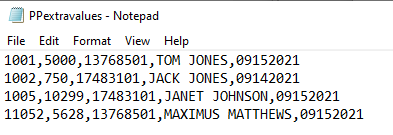
Example of file with more than required values: Oder of fields is Check, Amount (without decimals), Account Number, Payee, Write Date. Again, these can be in any order.
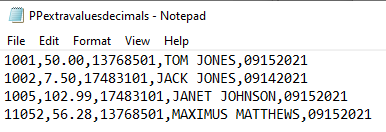
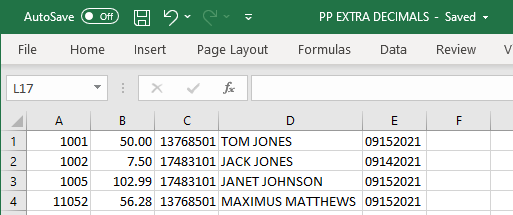
Amounts can contain decimals; you will indicate whether the file contains amounts with decimals during file upload process.
Example of file with decimals in amounts:
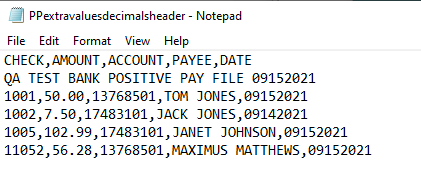
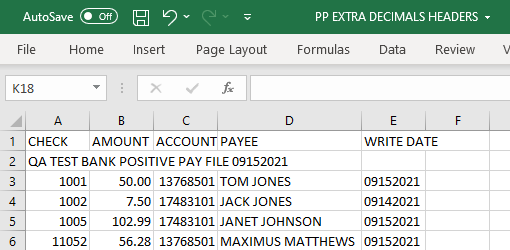
Files can contain header rows – these lines can contain anything and there is no limit to how many header rows exist in the file. You will indicate whether header rows exist and how many during file upload process.
Example of file with 2 header rows:
Steps to create a comma delimited file in Excel:
Open Excel.
Files must contain the following fields: Account Number – Must be an account that has positive pay enabled, Amount, Serial Number.
The following fields can be added but are not required: Filler – Any extra field not already listed, Payee, Void, Write Date.
Each line is an issued check, and all lines must contain the same fields. (One field per excel cell.) The fields can be in any order – the order of the fields will be set during file upload. The file type is set when file is saved. Be sure to set Save as type field to CSV (comma delimited) when saving Excel spreadsheet.
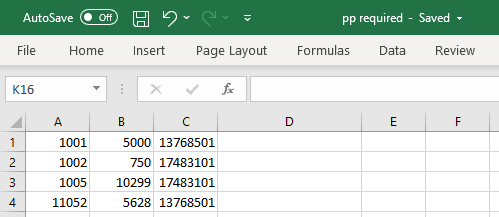
Example of file with just required values: Order of fields is Check, Amount (without decimals), Account Number. Again, these can be in any order.
Example of file with more than required values: Oder of fields is Check, Amount (without decimals), Account Number, Payee, Write Date. Again, these can be in any order.
Amounts can contain decimals; you will indicate whether the file contains amounts with decimals during file upload process.
Example of file with decimals in amounts:
Files can contain header rows – these lines can contain anything and there is no limit to how many header rows exist in the file. You will indicate whether header rows exist and how many during file upload process.
Example of file with 2 header rows:
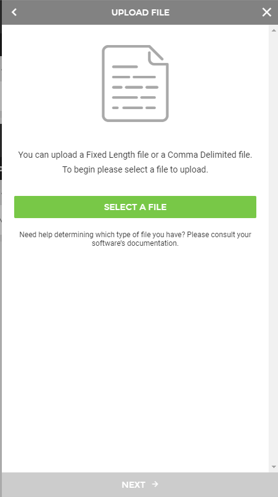
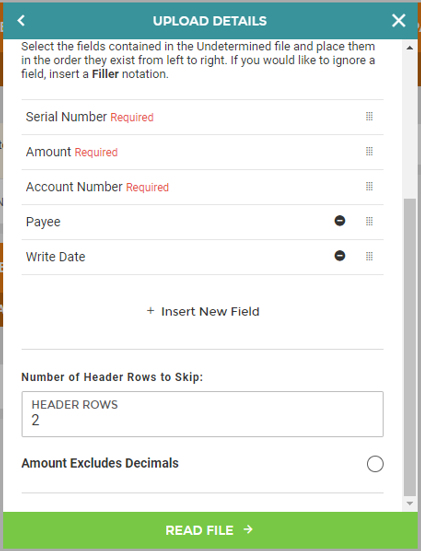
Once the file is selected, click Next. You must now tell digital how to read the file. This is done by setting the file layout.
You can move the fields up and down according to where they exist in the file and can insert any fields that exist in the file but are not already displayed.
If the file contains header rows, enter the number of rows in the Number of Header Rows to Skip field.
If the file does not include decimals, mark the "Amount excludes decimals" option.
This would be the file layout for the file above:
Once layout is set, click Read File. If issues exist with layout, you may see an error on the screen about missing values or incorrect values.
Review file details and click Review if correct.
If issues exist, go back to previous screen and correct layout.
Review and click Submit File.
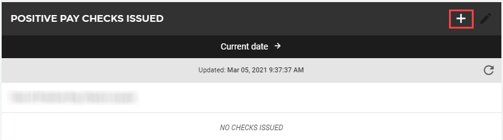
Issued checks with today’s date will be displayed in Positive Pay Checks Issued grid.
To see checks for other dates, you will need to modify the date range.
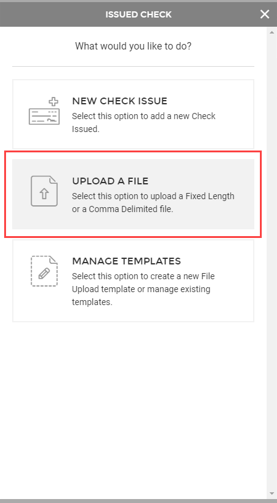
Fixed Length: Select a fixed length fileSteps to create a fixed length file in Notepad:
Open Notepad.
Files must contain the following fields: Account Number – Must be an account that has positive pay enabled, Amount, Serial Number.
The following fields can be added but are not required: Filler – Any extra field not already listed, Payee, Void, Write Date.
Each line is an issued check, and all lines must contain the same fields.
The fields can be in any order; the order of the fields will be set during file upload.
Fields are each a set length; they can be any length but each entry much have the same length for that field. Spaces can be used to fill in any blanks between fields.
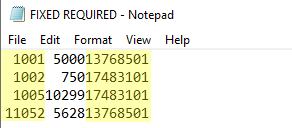
Example of file with just required values: Order of fields is Check, Amount (without decimals), Account Number. Again, these can be in any order.
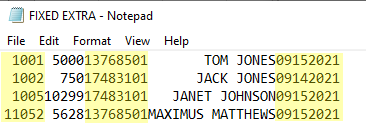
Example of file with more than required values: Oder of fields is Check, Amount (without decimals), Account Number, Payee, Write Date. Again, these can be in any order.
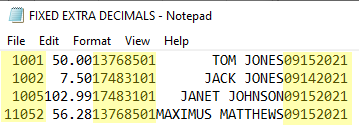
Amounts can contain decimals; you will indicate whether the file contains amounts with decimals during file upload process.
Example of file with decimals in amounts:
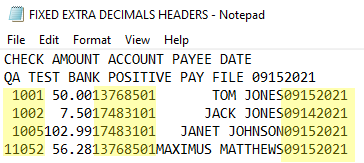
Files can contain header rows – these lines can contain anything and there is no limit to how many header rows exist in the file. You will indicate whether header rows exist and how many during file upload process.
Example of file with 2 header rows:
Once selected file is selected, click Next.
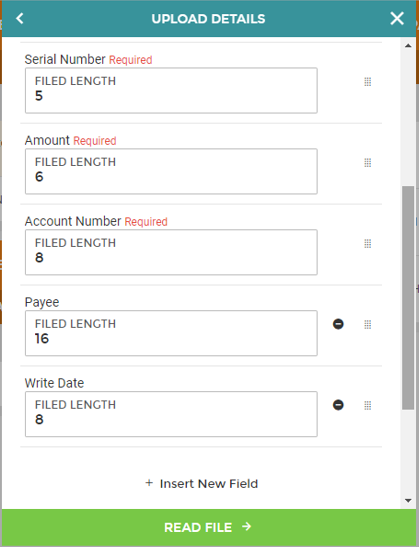
You must now tell digital how to read the file. This is done by setting the file layout.
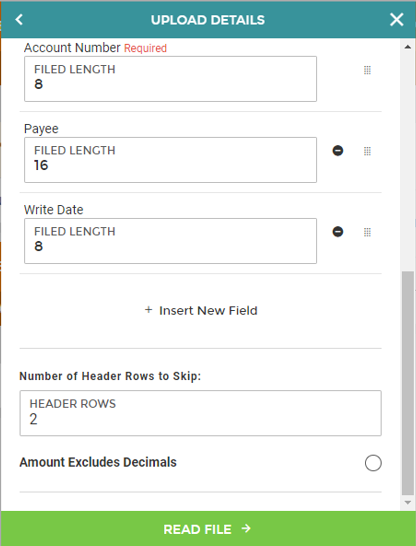
You can move the fields up and down according to where they exist in the file and can insert any fields that exist in the file but are not already displayed.
You must enter the length of each file field. In the case of the file above, the length of the fields corresponds to the longest length value for each field – 5/6/8/16/8
If the file contains header rows, enter the number of rows in the Number of Header Rows to Skip field.
If the file does not include decimals, mark the Amount excludes decimals option.
This is how the fields must be set for the file we just set the layout for:
This would be the file layout for the file above:
Once layout is set, click Read File; if issues exist with layout, you may see an error on the screen about missing values or incorrect values.
Review file details and click Review if correct. If issues exist, go back to previous screen and correct layout.
Review and click Submit File.
Issued checks with today’s date will be displayed in Positive Pay Checks Issued grid.
To see checks for other dates, you will need to modify date range.
 Customer Portal