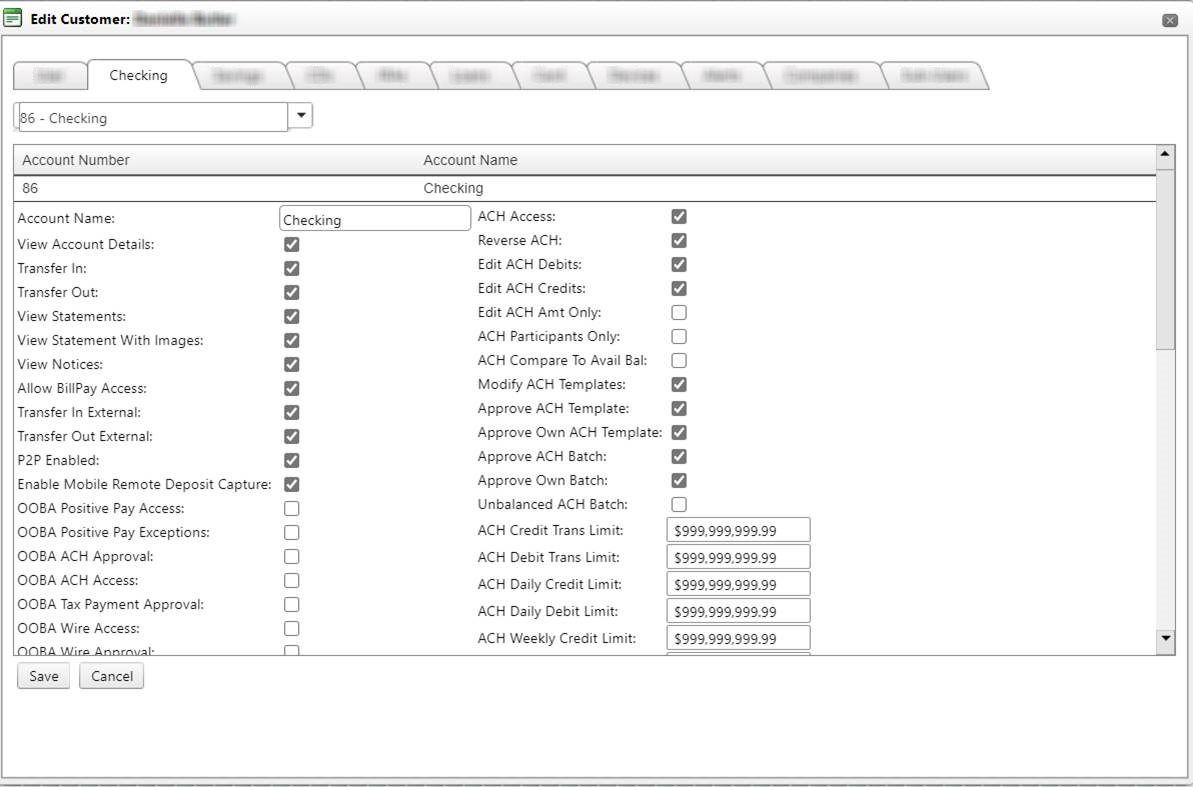
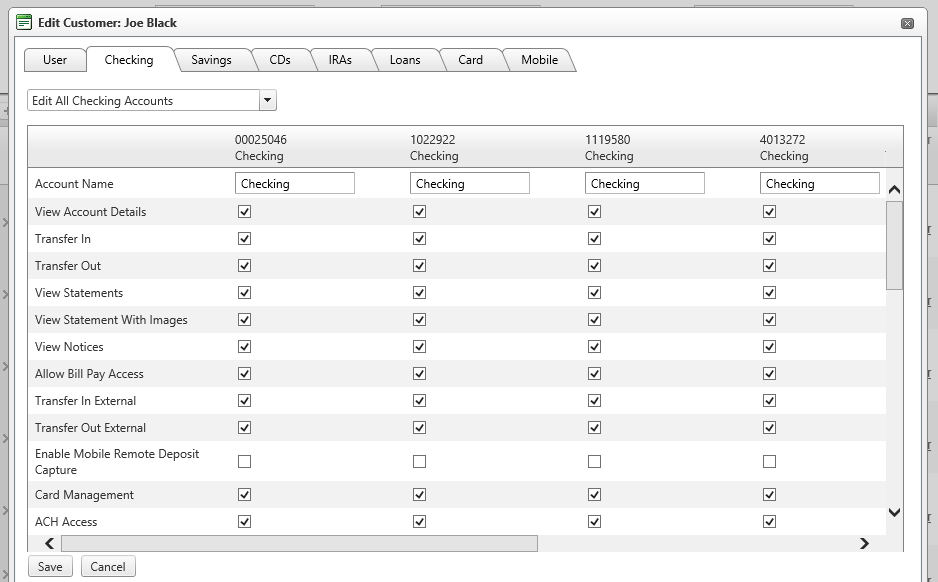
Edit Customer >> Checking tab
Single Account
Multiple Accounts
Checking and Savings Tab: If a Savings account is present, the same fields that apply for Checking will appear.
- Account Name: will reflect the name of the account; by default it will be reflective of the account application, but if changed by the user, the nickname of the account will display here.
- View Account Details: when enabled, the user will have the ability to view the account within digital banking, including its balances and transactional information. They will also be able to grant permission of this account to sub-users if sub-user functionality is offered.
When this option is disabled by an admin user, customers are unable to see the account. For example, if the customer has just one checking account and an admin user un-checks the View Account Details box on the customer's checking account, the Checking tab will not be seen by the customer.
When this option is disabled, customers are also unable to transfer money out of the specific account. The Transfer Out and Transfer Out External options automatically become disabled upon saving for Checking and Savings accounts. For advancing loans, the Allow Advance option is disabled automatically upon save which means that those accounts cannot make advances. These options remain disabled until the user enables the View Account Details option for the account. Users are however, still able to transfer into these Checking and Savings accounts.
Note: The information pertaining to transfer to and from accounts, loan payments, and loan advances is dependent on the user having the necessary permissions to perform the transfers, payments, and advances.
Accounts with the "View Account Details" option disabled are unable to transfer out, so they do not appear in the "From Account" drop down menu but do appear in the "To Account" drop down menu under the Transfers tab. When transferring to an account with the option disabled, the account will not display a balance in the transfer confirmation screens since the user does not have permission to view account details.
Accounts with the "View Account Details" option disabled are unable to transfer out, so they do not appear in the "From Account" drop down menu under the Loan Payment tab but loans with the option disabled are displayed in the Loan drop down menu. When making a payment to a loan with the option disabled, the loan will not display a balance in the payment confirmation screens since the user does not have permission to view account details.
Accounts with the "View Account Details" option disabled are unable to transfer out, so they do not appear in the "Loan" drop down menu under the Loan Advances tab but loans with the Checking and Savings accounts with the option disabled are displayed in the To Account drop down menu. When making an advance to a Checking or Savings account with the option disabled, the account will not display a balance in the loan advance confirmation screens since the user does not have permission to view account details.
When making a Quick Transfer, each of the other Checking and Savings accounts are listed but balances only appear for accounts that have the option enabled; this applies to the Quick Transfer tab and the confirmation screens for the transfers.
If you try to make a quick transfer from one of the accounts with the option disabled, they will receive a message letting them know that they do not have permission to transfer from the account and the transfer will not go through.
When making a Quick Payment, the only accounts listed to make a payment from are the accounts with the option enabled.
If an account has ACH and/or Wire permissions enabled, they will be able to use the account regardless of the "View Account Details" option status.
If an account has the "View Account Details" option disabled, they will not be able to grant access to that account to any of their sub users. Accounts that have the option disabled will not be displayed in the "Grant Access To:" drop down menu located on the Settings > Sub-users tab.
- Transfer In: allow inbound transfers from an internal account
- Transfer Out: allow outbound transfers to an internal account
- View Statements: allow statements to be visible
- View Statement With Images: allow statements to be visible with images
- View Notices: when enabled, this allows notices to be visible
- Allow Bill Pay Access: when enabled, the customer will have bill pay access and can pay from the account
- Transfer In External: When marked, gives customers the ability to make a transfer from an external account into an internal Checking or Savings account. This field is only visible when External Transfers are enabled.
- Transfer Out External: When marked, gives customers the ability to make a transfer from an internal Checking or Savings account to an external account. This field is only visible when External Transfers are enabled.
- P2P Enabled: With Peer to Peer enabled at the bank level, this option is displayed at the checking level for customers. It is turned off by default and is not available for any other account type. If enabled, it will allow customers to move money to an account that they do not own. (ex: paying the babysitter)
- Enable Remote Deposit Capture: when enabled, this feature allows a customer to make a deposit, via mobile app, to the account
- Card Management: When enabled, this feature allows customers the ability to toggle their debit card on/off as well as the ability to activate new debit cards. This feature will only display if enabled at the bank level
- Card Limit Suspension: When enabled, this feature allows a customer access to greater funds, up to 10K (bank defined) for 30 minutes. After 30 minutes the limits revert back to the standard daily limit for purchases. This feature will only display if enabled at the bank level
- Card Pin Change: when enabled, this feature allows a customer the ability to change their PIN within digital banking. This feature will only display if enabled at the bank level
- ACH Access: Allows the customer to access the Cash Manager>ACH tab.
- Reverse ACH: allows customers the ability to reverse an ACH file
- Edit ACH Debits: Allows the customer to build, edit or delete a debit batch transaction.
- Edit ACH Credits: Allows the customer to build, edit or delete a credit batch transaction.
- Edit ACH Amount Only: Limits the customer to only being able to change the amount of a batch transaction.
- ACH Participants Only: This option is available for both checking and savings accounts. This permission carries over to sub-user permissions. If the option is not enabled for the account, the master user can choose to enable the option for the sub-user. However, if the option is enabled for the account, the master user cannot choose to disable the option for the sub-user.
- When the option is enabled for an account, customers are only able to add transactions to an ACH batch that are tied to the customer’s participants. When an account with the option enabled is selected as the offsetting account, the Add Details option is not displayed in the current batch transactions grid since the only transactions that can be added are those tied to participants.
- When the option is disabled for an account, customers are able to add transactions to an ACH batch that are tied to the customer’s participants as well as transactions that are not tied to participants. When an account with the option disabled is selected as the offsetting account, the Add Details option is displayed in the current batch transactions grid since transactions can be added that are not tied to participants.
Note: If a customer adds a transaction to a batch that is not tied to a participant and then decides to change the offsetting account to one that has the ACH Participants Only option enabled, the customer will receive a message stating that the transactions not belonging to participants will be deleted. This message can also appear when participants are added to a batch and the company is changed. If the participant does not belong to the company, the batch cannot be saved without deleting the transaction. Please note that this message only appears once the customer saves the batch with the conflicting account or company.
- Modify ACH Templates: allows user to make changes to existing ACH templates
- Approve ACH Template: allows users to approve modifications made to existing ACH templates
- Approve Own ACH Template: allows the user to approve modifications they made to existing ACH templates
- Modify Wire Templates: allows a user to make changes to existing Wire templates
- Approve Wire Templates: allows users to approve modifications made to existing wire templates
- Approve Own Wire Templates: allows users to approve modifications they made to existing wire templates
- Unbalanced ACH Batch: Check this field to give the customer the permission to see the ‘Balance or Approve’ button for that account. If that option is not checked, then the customer will not see those options for that account.
- ACH Transaction Credit Limit: Determines the limit for amount of credits that a transaction tied to this account can be set up with. A customer will not be able to submit a batch that goes over this limit.
- ACH Transaction Debit Limit: Determines the limit for amount of debits that a transaction tied to this account can be set up with. A customer will not be able to submit a batch that goes over this limit.
- ACH Daily Credit Limit: Determines the limit for the amount of credits in the batches tied to this account for each effective date. The financial institution will receive a warning if the customer goes over the daily limit, but it will not stop the customer from submitting batches. When a user includes the offset account as a batch detail, the amount of that detail will not be counted towards the daily limits of the account. The limit counts items that are being submitted out of the bank or from an offsetting account not owned by the customer.
- ACH Daily Debit Limit: Determines the limit for the amount of debits in the batches tied to this account for each effective date. The financial institution will receive a warning if the customer goes over the daily limit, but it will not stop the customer from submitting batches. When a user includes the offset account as a batch detail, the amount of that detail will not be counted towards the daily limits of the account. The limit counts items that are being submitted out of the bank or from an offsetting account not owned by the customer.
- ACH Weekly Credit Limit: Determines the limit for the amount of credits in the batches tied to this account for each effective date. The financial institution will receive a warning if the customer goes over the weekly limit, but it will not stop the customer from submitting batches. When a user includes the offset account as a batch detail, the amount of that detail will not be counted towards the weekly limits of the account. The limit counts items that are being submitted out of the bank or from an offsetting account not owned by the customer.
- ACH Weekly Debit Limit: Determines the limit for the amount of debits in the batches tied to this account for each effective date. The financial institution will receive a warning if the customer goes over the weekly limit, but it will not stop the customer from submitting batches. When a user includes the offset account as a batch detail, the amount of that detail will not be counted towards the weekly limits of the account. The limit counts items that are being submitted out of the bank or from an offsetting account not owned by the customer.
- ACH Monthly Credit Limit: Determines the limit for the amount of credits in the batches tied to this account for each effective date. The financial institution will receive a warning if the customer goes over the monthly limit, but it will not stop the customer from submitting batches. When a user includes the offset account as a batch detail, the amount of that detail will not be counted towards the monthly limits of the account. The limit counts items that are being submitted out of the bank or from an offsetting account not owned by the customer.
- ACH Monthly Debit Limit: Determines the limit for the amount of debits in the batches tied to this account for each effective date. The financial institution will receive a warning if the customer goes over the monthly limit, but it will not stop the customer from submitting batches. When a user includes the offset account as a batch detail, the amount of that detail will not be counted towards the monthly limits of the account. The limit counts items that are being submitted out of the bank or from an offsetting account not owned by the customer.
- ACH Batch Credit Limit: Determines the limit for amount of credits that a batch tied to this account can be set up with. A customer will not be able to submit a batch that goes over this limit. When a user includes the offset account as a batch detail, the amount of that detail will not be counted towards the daily limits of the account. The limit counts items that are being submitted out of the bank or from an offsetting account not owned by the customer.
- ACH Batch Debit Limit: Determines the limit for amount of debits that a batch tied to this account can be set up with. A customer will not be able to submit a batch that goes over this limit. When a user includes the offset account as a batch detail, the amount of that detail will not be counted towards the daily limits of the account. The limit counts items that are being submitted out of the bank or from an offsetting account not owned by the customer.
- ACH Compare to Available Balance: when enabled, the system will verify available funds on the account prior to the batch processing. If the batch is over the available funds amount, it will not be stopped at the customer level but will appear on the admin system with a warning. The admin can elect to approve the batch to continue processing or deny the batch in which it would not process.
- ACH Tax Payments: Allows the customer to access the Cash Manager>ACH>Tax Payments tab.
- Approve ACH Tax: Allows the customer to approve an ACH tax payment.
- Tax Daily Limit: Determines the limit for the total amount of all of the tax payments tied to this account for each effective date. The bank will receive a warning if the customer goes over the daily limit, but it will not stop the customer from submitting tax payments.
- Tax Weekly Limit: Determines the limit for the total amount of all of the tax payments tied to this account for each effective date. The bank will receive a warning if the customer goes over the weekly limit, but it will not stop the customer from submitting tax payments
- Tax Monthly Limit: Determines the limit for the total amount of all of the tax payments tied to this account for each effective date. The bank will receive a warning if the customer goes over the monthly limit, but it will not stop the customer from submitting tax payments.
- Tax Trans Limit: Determines the limit for the amount that any tax payment tied to this account can be set up with. A customer will not be able to submit a tax payment that goes over this limit.
- Wire Transfer Access: Allows the customer to access the Cash Manager>Wires tab
- Wire w/o Template: allows a customer to build a wire from scratch, without being limited to the templates available.
- Wire Transfer Approval: Allows the customer to approve a wire transfer that was submitted by another customer with the same account.
- Approve Own Wire Transfers: Allows the customer to approve a wire transfer that they themselves submitted.
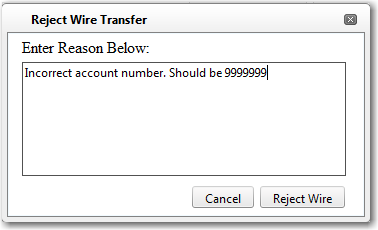
- Wire Transfer Rejection: Allows the customer to reject a wire that has been submitted or approve by a customer with that account. When rejecting a wire, you are prompted to enter a reject reason. Once rejected, the customer would have the ability to edit a wire and re-submit after making changes.
- Delete Wire Transfers: Allows the customer to delete a wire transfer that was submitted or approve by another user with that account.
- Delete Own Wires: Allows the customer to delete a wire that they themselves submitted or approved.
- Wire Daily Limit: Determines the limit for the total amount of all of the wire transfers tied to this account for each effective date. The bank will receive a warning if the customer goes over the daily limit, but it will not stop the customer from submitting wire transfers.
- Wire Weekly Limit: Determines the limit for the total amount of all of the wire transfers tied to this account for each effective date. The bank will receive a warning if the customer goes over the weekly limit, but it will not stop the customer from submitting wire transfers
- Wire Monthly Limit: Determines the limit for the total amount of all of the wire transfers tied to this account for each effective date. The bank will receive a warning if the customer goes over the monthly limit, but it will not stop the customer from submitting wire transfers
- Wire Trans Limit: Determines the limit for the amount that any wire transfer tied to this account can be setup with. A customer will not be able to submit a wire transfer that goes over this limit.
- Positive Pay Access: Allows the customer to access the Cash Manager >> Positive Pay tab.
- Outbound Trans Limit: the amount of money per transfer a customer can make to an external account.
- Outbound Daily Limit: limits the amount of money a customer can schedule to transfer to an external account on a given day.
- Inbound Trans Limit: the amount of money per transfer a customer can make from an external account.
- Inbound Daily Trans Limit: limits the amount of money a customer can transfer from an external account on a given day.
Note: When a customer has exceeded his limits, the system will show the bank a message when hovering over the yellow triangle "Account ***** is over Daily Trans Limit."
- OOBA Positive Pay Exceptions: Not selected by default. With this box checked, when the customer logs in and goes to the Positive Pay Exceptions tab, the Requires OOBA window appears. If the customer has the device set up as a mobile that can receive text messages, they have the option to receive a mobile app push, phone call, or passcode.
- OOBA Positive Pay Access: invalid
- OOBA ACH Approval: Not selected by default.With this box checked, when the customer logs in and approves an ACH batch, the Requires OOBA window appears. If the customer has the device set up as a mobile that can receive text messages, they have the option to receive a mobile app push, phone call, or passcode.
- OOBA ACH Access: invalid
- OOBA Tax Payment Approval: Not selected by default.With this box checked, when the customer logs in and approves an ACH Tax Payment, the Requires OOBA window appears. If the customer has the device set up as a mobile that can receive text messages, they have the option to receive a mobile app push, phone call, or passcode.
- OOBA Wire Approval: Not selected by default. With this box checked, when the customer logs in and goes to the Wire Approval tab, the Requires OOBA window appears. If the customer has the device set up as a mobile that can receive text messages, they have the option to receive a mobile app push, phone call, or passcode.
- OOBA Wire Access: invalid
- OOBA Access Cash Management: Not selected by default. With the Access Cash Management box checked, when the customer logs in and goes to the Cash Manger tab, the Requires OOBA window appears. If the customer has the device set up as a mobile that can receive text messages, they have the option to receive a mobile app push, phone call, or passcode.
- OOBA External Transfers: Not selected by default. With this box checked, when the customer logs in and goes submits an External Transfer, the Requires OOBA window appears. If the customer has the device set up as a mobile that can receive text messages, they have the option to receive a mobile app push, phone call, or passcode.
- OOBA Bill Pay Access: Not selected by default. With this box checked, if the customer is Enrolled in bill pay and has the Warn if Leaving Main Site Via Bill Pay Link flag checked, then the Requires OOBA window will appear. If the customer has the device set up as a mobile that can receive text messages, they have the option to receive a mobile app push, phone call, or passcode.
- OOBA SubUser Save: Not selected by default.With this box checked, when the customer logs in and makes changes to a checking account, the Requires OOBA window appears. If the customer has the device set up as a mobile that can receive text messages, they have the option to receive a mobile app push, phone call, or passcode.Note: This applies to the sub-user’s permissions for checking accounts only. You are able to grant permissions to CDs, IRAs, and external accounts without OOBA. Sub-users are also able to be added and deleted without authentication.
- OOBA iPay Payment Scheduling: Not selected by default. With this box checked, when the customer schedules an iPay bill payment, the requires OOBA window appears. If the customer has the device setup as a mobile that can receive text messages, they have the option tot receive a mobile app push, phone call, or passcode.
- OOBA P2P: The P2P field, when set, will require authentication when using the account to complete a P2P transaction. If the customer has the device set up as a mobile that can receive text messages, they have the option to receive a mobile app push, phone call, or passcode.
- OOBA Add Payee: For Multi-Factor Authentication. Only available for checking accounts when P2P is enabled. If the customer has the device set up as a mobile that can receive text messages, they have the option to receive a mobile app push, phone call, or passcode.
- OOBA Remote Deposit Capture: With this option enabled, customers will be prompted to verify their identity via device when selecting the RDC tab under Cash Management. If the customer has the device set up as a mobile that can receive text messages, they have the option to receive a mobile app push, phone call, or passcode.
- OOBA Card PIN Change: with this option enabled, customers will be required to authenticate themselves before a PIN change can be completed. If the customer has the device set up as a mobile that can receive text messages, they have the option to receive a mobile app push, phone call, or passcode.
- OOBA Card Limit Suspension: with this option enabled, customers will be required to authenticate themselves before the limit suspension feature can be completed. If the customer has the device set up as a mobile that can receive text messages, they have the option to receive a mobile app push, phone call, or passcode.
- Authenticator Positive Pay Exceptions: Not selected by default. With this box checked, when the customer logs in and goes to the Positive Pay Exceptions tab, authentication via token will be required. Based on authentication method (token or mobile app) the system will require response.
- Authenticator Positive Pay Access: invalid
- Authenticator ACH Approval: Not selected by default .With this box checked, when the customer logs in and approves an ACH batch, the requires authentication window appears. Based on authentication method (token or mobile app) the system will require response.
- Authentication ACH Access: invalid
- Authenticator Tax Payment Approval: Not selected by default. With this box checked, when the customer logs in and approves an ACH Tax Payment, the requires authentication window appears Based on authentication method (token or mobile app) the system will require response.
- Authentication Wire Approval: Not selected by default. With this box checked, when the customer logs in and goes to the Wire Approval tab, the requires authentication window appears. Based on the authentication method (token or mobile app) the system will require response
- Authentication Wire Access: invalid
- Authentication Access Cash Management: Not selected by default. With the Access Cash Management box checked, when the customer logs in and goes to the Cash Manger tab, the requires authentication window appears. Based on the authentication method (token or mobile app) the system will require response.
- Authentication External Transfers: Not selected by default. With this box checked, when the customer logs in and goes submits an External Transfer, the requires authentication window appears. Based on authentication method (token or mobile app) the system will require response
- Authentication Bill Pay Access: Not selected by default. With this box checked, if the customer is Enrolled in bill pay and has the Warn if Leaving Main Site Via Bill Pay Link flag checked, then the requires authentication window appears. Based on authentication method (token or mobile app) the system will require response.
- Authentication Sub User Save: Not selected by default. With this box checked, when the customer logs in and makes changes to a checking account, the requires authentication window appears.. Based on the authentication method (token or mobile app) the system will require response. Note: This applies to the sub-user’s permissions for checking accounts only. You are able to grant permissions to CDs, IRAs, and external accounts without Authentication. Sub-users are also able to be added and deleted without authentication.
- Authentication iPay Payment Scheduling: Not selected by default. With this box checked, when the customer schedules an iPay bill payment, the requires authentication window appears. Based on authentication method (token or mobile app) the system will require response.
- Authentication P2P: The P2P field, when set, will require authentication when using the account to complete a P2P transaction. Based on authentication method (token or mobile app) the system will require response.
- Authentication Add Payee: Regarding P2P, when a new payee is being added, when checked, the customer will be prompted for authentication. Based on authentication method (token or mobile app) the system will require response.
- Authentication Remote Deposit Capture: With this option enabled, customers will be prompted to verify their identity via token or mobile app when selecting the RDC tab under Cash Management. Based on authentication method (token or mobile app) the system will require response.
- Authentication Card PIN Change: with this option enabled, customers will be required to authenticate themselves before a PIN change can be completed. Based on authentication method (token or mobile app) the system will require response.
- OOBA Card Limit Suspension: with this option enabled, customers will be required to authenticate themselves before the limit suspension feature can be completed. Based on authentication method (token or mobile app) the system will require response.
The following fields will display when properly enabled for the financial institution. P2P must be enabled for your institution in order to use the Override Card Transfer Maximum, Daily Card Transfer Maximum, and the Single Transfer Maximum fields. Remote Deposit Capture must be enabled for your institution in order to use the Enable Remote Capture option.
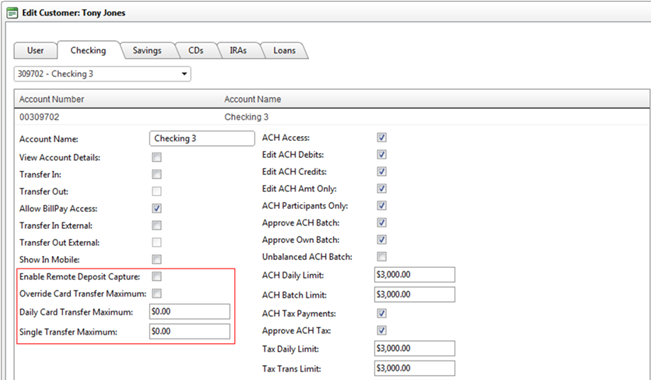
- Enable Mobile Remote Deposit Capture: This field will only be displayed on the Customers tab if the Enable Mobile Remote Deposit Capture option is enabled on the Bank Settings >> Mobile tab. If the Default Remote Deposit Capture option is enabled on the Mobile tab, new accounts that are added will have the Enable Remote Deposit Capture option enabled by default; otherwise the option will be disabled by default.
- Override Card Transfer Maximum: This will only be displayed on the Customers tab if the P2P Enabled option is enabled on the Bank Settings >> Mobile tab.
- Daily Card Transfer Maximum: This will only be displayed on the Customers tab if the P2P Enabled option is enabled on the Bank Settings >> Mobile tab.
- Single Transfer Maximum: This will only be displayed on the Customers tab if the P2P Enabled option is enabled on the Bank Settings >> Mobile tab.
60024
|
 Customer Portal