Employees tab
Bank employees have access and permissions according to their needs and bank management policies.
This tab allows the setup of the admin for the bank as well as those employees requiring access and different functionalities.
Note: Notice that there is a slide bar on the bottom of the window. The additional permission fields, described below, display as you scroll to the right.
Adding an Employee Record
To add a new employee record, select Add new record.

Fill in the fields for this employee record, beginning with the Employee Name, User Name, and Email Address. Slide the display to the right, and check applicable boxes (descriptions follow) for permissions. Some permissions will not display if those options are not enabled for your financial institution.

- Employee Name: Name of employee.
- User Name: Login name. Spaces are not allowed.
- Password: Notice it is not viewable, but an employee with the correct permissions could edit it.
- Force Password Change: Requires the employee to change the password on next login.
- Email Address: Email address associated with login name
- Security Questions and Answers: Security Questions elected by the employee will be viewed here; however, the answers will not display. Those employees with appropriate permissions can change the security answers if needed.
- Edit Bank Settings: Allows an employee access to the Bank Settings tab.
- Edit Employees: Allows employee access to add/edit employees.
- Edit Customers: Allows employee access to add/edit customers.
- Edit Company: Allows employee access to add/edit companies.
- Edit Cash Management: Allows employee to add/edit cash management features for users.
- Edit Customer Passwords: Allows an employee to update/change a customer's password. (We suggest that you force a password change after performing this function.)
- When Edit Customers, Edit Cash Management, and Change Customer Passwords are all enabled, the employee will be able to edit all fields for a customer.
- When Edit Cash Management is disabled, all cash management options will be read-only.
- When Edit Customer is disabled and Edit Cash Management is enabled, the employee will not be able to Delete, Invite, Disable, and Add Accts at the User/Customer level. They will only be able to edit at the Customer and Account level.
- When Edit Customers and Edit Cash Management are disabled, the employee will only be able to edit customer passwords.
- When Edit Customers, Edit Cash Management, and Change Customer Passwords options are disabled, the Security >> Customers tab will no longer display.
- Edit Customer Security Answers: When either this option or the Edit Customers option is enabled, the employee will have permission to reset security question answers. This allows for permission to edit answers to security questions without giving them permission to edit all of the customer fields and permissions.
- Receive Email for Daily Imports/Extracts: Employee will receive notifications of completed scheduled task processing or manually processed extracts
- Access Messages: Employee will have access to the messaging system when checked. They will have permissions for initiating or receiving secure communication to customers.
- Admin Message System: This selection defines access permissions to the messaging system. If not selected, the only tab available is the Inbox tab.
- Approve ACH: Employee will have permission to approve ACH files before processing.
- Reverse ACH: Employee will have permission to reverse ACH batches and approve customers to reverse ACH batches.
- Extract Files: Employee will have permission to create ACH files that have been approved.
- Receive Email for ACH: The system generates an e-mail when there are ACH files waiting to be processed at the bank's ACH processing cutoff time. When checked, the employee receives this email. The employee will also receive email notification of the number of batches processed with a breakout of Debit and Credit totals. A separate email will be sent to the employee detailing items that were not processed because they exceed the customer's daily limit.
- Receive Email for Approved ACH Batches: When enabled for an employee, that employee will receive an email alert every time an ACH batch is approved by a customer. The email will be based off of the Alert email template (can be customized under Manage Email Templates tab)
- Manage Wires: When the customer creates a wire request, the employee has permission to manage the wires, when checked.
- Delete Wires: When checked, this permission allows an employee to be able to delete a wire that has been approved by a customer.
- Receive Email for Wires: When the customer creates a wire request, an email is sent to the bank for a pending request. When checked, the employee receives this email.
- Access Reports: Allows employee access to administrative reports.
- Access VoiceLinks: No longer used.
- Receive Email for External Accounts: Employees who have this permission enabled will receive an email alert when an external account is submitted by a customer, verified by a customer, and/or when a customer fails to verify the account using deposit verification
- Edit External Accounts: This setting controls whether an employee has access to add or edit an external account. This field is only visible when External Transfers are enabled.
- Verify External Accounts: This setting controls whether an employee has access to verify external accounts. This field is only visible when External Transfers are enabled.
- Manage OOBA Users: When OOBA (Out of Band Authentication) is enabled for your financial institution, this option will appear. When enabled, this allows employees to Manage OOBA users and settings.
- Edit Bank Whitelist: Allows an employee to edit the listing of IP addresses that employees are allowed to use to log in to the digital banking system.
- Edit Bank Blacklist: Grant permission for this employee to edit bank blacklisting.
- Edit Customer Whitelist: Enables employee to turn on whitelisting for a customer, and enter whitelisted IP addresses or Locations.
- Authenticator - Employee: When an employee has the Authenticator – Employee option enabled, the Security >> Authenticator >> Employee tab will be available to the employee. This tab will only be displayed and available to the employee when they have the permission enabled. Additionally, the Assign to Employee option will be available under the Unassigned tab. The option will only be displayed if the user has the Authenticator – Employee option enabled.
- Authenticator - Customer: When an employee has the Authenticator – Customer option enabled, the Security >> Authenticator >> Customer tab will be available to the employee. This tab will only be displayed and available to the employee when they have the permission enabled. Additionally, the Assign to Customer option and the Assign for Redistribution option will be available under the Unassigned tab. The option will only be displayed if the user has the Authenticator – Customer option enabled.
Note: When an employee has both of the options disabled, neither the Security >> Authenticator >> Customer or Employee tabs will be available to the employee. Additionally, none of the assign to options will be displayed and available to the employee under the Unassigned tab. The employee will only have the ability to view lost and unassigned authenticators.
- Access FAD: This option is only available if the bank is using FAD (Fraud Anomaly Detection). When enabled for an employee, they will be able to access all areas of FAD.
- Update FAD Session Status: When enabled, employees will be able to make changes to the status of a session (mark it as valid or fraudulent). This works in tandem with Access FAD Permission.
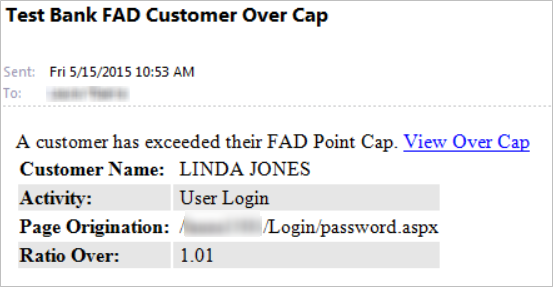
- Receive Email from Over Cap Users: When enabled, the employee will receive an email any time a customer exceeds his/her point cap.
- Receive Email from New Self Enrolled Users: When enabled, the employee will receive an email when a user has completed the self-enrollment process.
- Allow to Approve/Deny Self Enrolled Users: When enabled, the employee will have the ability to approve/deny pending self-enrolled users.
- Can Access Marketing Reporter Screen: Can set up Reporters in Digital Banking in order to create lists for marketing. Tab name is Marketing >> Reporter.
- Can Access Marketing Template Screen: Can set up email templates for marketing. Tab name is Marketing >> Templates.
- Can Access Marketing Campaign Screen: Can set up campaigns to link Reporters with email templates. Tab name is Marketing >> Campaign.
- Can Access Marketing Stats Screen: Can view the statistics for already-sent marketing campaigns. Tab name is Marketing >> Stats.
- Manage Customer Alerts: When enabled, the Alerts tab will be available in the Edit Customer window.
- Can Login As Customer: When enabled, bank admin users will have access to a login as a user to see the user's digital banking information. Employees logged in as a customer may not change, save, or submit any type of transactions. This allows the employee to see a link called "Login as Customer" under Security >> Customers on the far right.
- Can Login as Restricted Customer: The Restricted tab will be visible under Admin >> Security if this box is checked.
- Last Login: History of last login date and time for each user.
- Authenticator Attached: Notes if an authenticator is attached for this login.
Click Save when you are finished.
Once the save takes place and the employee is added to the system, you will need to click Invite. This will issue the invite email to the employee for first time login.
The new employee is now added, and may be edited, or deleted using the links to the left of the name.
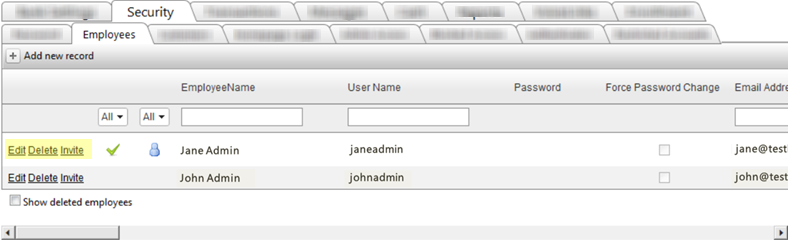
Once the employee is added, they will need to be invited to the system by clicking Invite next to their name. This will send an email to them for first time login.
19439
|
 Customer Portal